No business exists in a bubble. Therefore any vendor needs to take any external pressures…

All You need to know about Photography Business Website in Kenya
If you want to attract new clients and build a successful photography business, you must have a professional photography website. A great web design solutions agency , is better placed to deliver a photography website design in Kenya for your business.
However, simply having a website is no longer sufficient; you must also have a visually appealing website with an excellent user experience (UX). According to studies, online consumers are less likely to return to a site after a negative experience.”
With the growth in demand for photography, the need for a robust photography website design for your small business in Kenya is a must.
Fortunately, investing in a well-designed website can yield excellent results. According to Forrester, every dollar invested in UX returns an average of $100. We’ll look at how to create a photography website with great UX that will win you clients, whether you’re an independent photographer looking to build your own website or a designer working on a client’s photography website.
Checklist for Photography Website Solution
-
Determine your ideal customer.
As a photographer, the idea of narrowing down your target audience may make you cringe. I understand—no artist wants to limit their potential clients. However, defining your target audience should not be about limiting potential clients, but rather about assisting you in meaningfully connecting with each of your ideal clients. Try answering the following four questions as you go through this process:
- Which types of customers have you charged the most for your services?
- Which types of photography in your portfolio are you most likely to charge the most for?
- What kind of new clients do you want to work with the most?
- Which type of photography do you enjoy the most?
These questions should help you define the types of clients you’d like to work with.
-
Determine your conversion objectives.
Once you’ve determined who you want to visit your photography website business and it’s design in Kenya, you can be more specific about what you want them to do. If you provide highly personalized services, you might want site visitors to fill out a contact form. If you’re a teacher, maybe your conversion goal is to get people to sign up for a class. Every gallery is conversion-optimized, with a button at the top of the screen that directs visitors to the contact form.
Big corporations with hundreds and hundreds of pages on their website often have multiple objectives, but for smaller sites, it’s best to set just one or two conversion goals. The more things you ask a visitor to do on a single page, the more perplexing the UX can become. Simplicity goes a long way toward providing a great UX that results in the conversions you desire.
-
Purchase a domain name
You can buy your own domain from a variety of websites. If you already have a Webflow account with a site plan, you can purchase a Google domain under Custom Domains in the Hosting tab.
If you have a specific target audience in mind, look for an SEO-focused domain that is aligned with that audience. If you’re a wedding photographer in Kenya, for example, the domain can be ‘weddingphotography.co.ke ‘ or ‘kenyaweddingphoto.com’ could help you rank higher in organic search. Professional photographers with multiple target audiences, on the other hand, frequently use their name or company name as their domain because it provides a lot of flexibility. If you’re having trouble coming up with names, try using a domain name generator.
-
Make a plan for the structure of your photography website.
Even if you plan to use a template rather than designing your own photography website from scratch, it’s a good idea to sketch out the sitemap you want before diving into design. If you don’t have a map to guide you while looking through beautiful photography templates or assigning photos to individual galleries, it’s easy to get off track.
Here are some examples of common pages to consider:
- Page about me on my homepage
- Photographic portfolio or gallery (with subpages for different types of photos)
- Page of Contacts
- Price list
- E-commerce blog or online store
You may also want to create a separate page for testimonials, awards, gallery showings, or tutorials, depending on your conversion goals.
-
Create your website.
Now comes the exciting part: website design! Whether you plan to use a template or start from scratch, be sure to look through the best design you want to have.
-
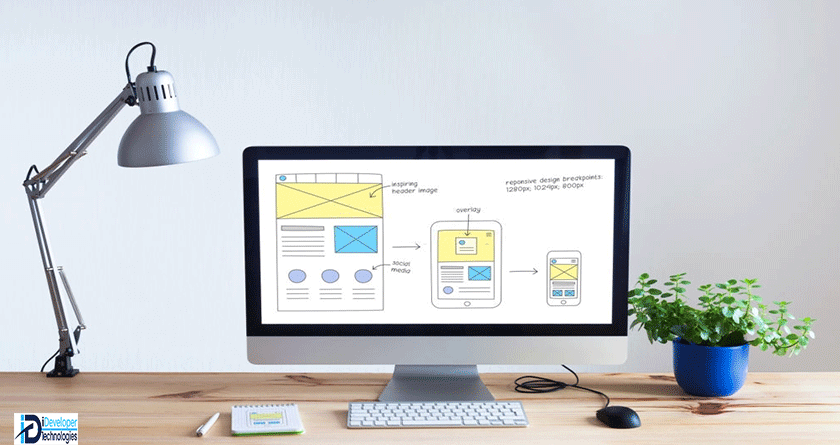
Make certain that your design is responsive.
Your website should look good on any device, from a 27-inch monitor to a smartphone screen. This is an important aspect of providing a great UX, and studies have shown that more than half of website visitors will not recommend a business if its mobile site is poorly designed.
Changes to your base breakpoint (the one with the star) have an effect on all views. You can also make changes that are specific to larger or smaller devices, which will intuitively cascade down or pass up to additional breakpoints. As a result, if you make fonts larger in the tablet view, the changes will be passed down to cell phone views but not up to desktop views.
Read: Top Design Elements and feature that your website should have
-
Take note of the image size and file type.
Check that you’re using the right image sizes and file types. In general, JPG and PNG files are ideal for photographs, while SVG files are ideal for logos, illustrations, and vector images. When it comes to image size, bigger isn’t necessarily better. Your goal should be to upload the smallest image possible while still looking good.
Most images with a width closer to 3K pixels will look fine on larger screens, and the costs of having an image that is too large can greatly outweigh the benefits. Photos that are too large can have a negative impact on SEO performance, increase load times and bounce rates, and create a bad user experience.
Google recommends serving responsive images to ensure that images are properly sized on any device. This can be a time-consuming process, but using a photography website builder like Webflow that optimizes inline images automatically can save you a lot of time. If you’re using Webflow, keep in mind that you’ll still need to manually upload background images in the correct file size for each device and place them at each breakpoint.
-
Prioritize image quality over quantity.
Select only your best individual images and consider how your online portfolio as a whole demonstrates your range. Visitors to websites have extremely short attention spans. If you overwhelm your audience with too many slight variations of photos from the same shoot, you risk losing them. You must clearly communicate your value proposition within 10 seconds to gain several minutes of user attention.” Enlist the help of some friends or social media followers if you’re having trouble deciding what to cut. Create a poll to see which images receive the most votes.
-
SEO optimization
Follow SEO best practices to improve your site’s visibility in search engines. Search Engine Optimization Solutions Should be incorporated during your photography website design for your business in Kenya. Whatever type of website you’re creating, you should make certain that each page has well-optimized title tags, meta descriptions, and proper heading structure.
More than a quarter of Google searches include images, which is good news if you want your photography website to appear in search results. You can use Google Trends to look up potential keywords and see what’s trending in Image Search in particular. Familiarize yourself with Google Images best practices, and don’t forget to add alt text to all of the images on your site. Because alt text is used in images, it is not only important for SEO but also for accessibility and inclusivity.
Because photography website design in Kenya & globally typically do not require a lot of text, they can be difficult to rank in Google search. Because it is a natural way to add more text to your site, adding a blog can be a great way to boost SEO. However, publishing enough well-optimized blog content to make a difference in organic growth requires a significant time commitment, so consider whether this is appropriate for your website.
-
Validate and publish
Once you’ve created a version of your website that you’re satisfied with, run some tests before hitting the publish button. Request feedback from a few current clients or friends on your design. This step is critical for optimizing your UX.
You’re ready to share your design with the world once you’ve made final edits based on test group feedback.
Related Posts